First some concepts
HTML5 Canvas
A tag that lets you draw in pixels using JavaScript. The canvas is a like a picture (a grid of pixels) that you can paint with JS commands. It is 2D and flat, it has no layers. You give the illusions of stacking objects by redrawing and rearanging the pixels.
Sprite
A reusable graphic object used in a program that can be moved and manipulated. If you remember from another project, a sprite sheet is a sheet of sprites. Everything visual in a game or other program can be called a sprite. In this game we will use sprites to paint our game objects on the canvas: player, goodies, etc.
Object
A programming concept for the logical organization of variables and functions in a program. This program uses objects very superficially, but it is a good idea for you to know what an object is in programming. Remember that variables are containers of values, functions are containers of commands and variables. Objects are containers of variables and functions. (This is a carricature, it is slightly more complex than this.)
User input: keyboard
To let the user control the program with the keyboard, you must test for the individual keys, each key has a unique ID. When any key is pressed, an event is triggered. You must validate which key is pressed to determine the action. In this tutorial, we use the arrow keys.
User input: touch
The game also uses the touch event for mobile control. This works by identifying the target object that triggers the touch event. This object becomes a control button, if you will. In this tutorial, there are four such ‘buttons’ on each side of the canvas. These can be used to play the game on mobile.
Game loop
This is what makes the game move. It is a function called at a certain interval. You will use this loop to change the parameters of the display, and to repaint the canvas. In our case we will use a JS command called requestAnimationFrame() to do this.
Collision test
This is usually a test to see whether two sprites come in contact. In other words, check if they share an area of the program’s drawing board. This tutorial uses a basic collision test function. This function can be reused, if you ever need one for another project.
IMPORTANT NOTES
Download the files package for this tutorial here. The package contains the following files.
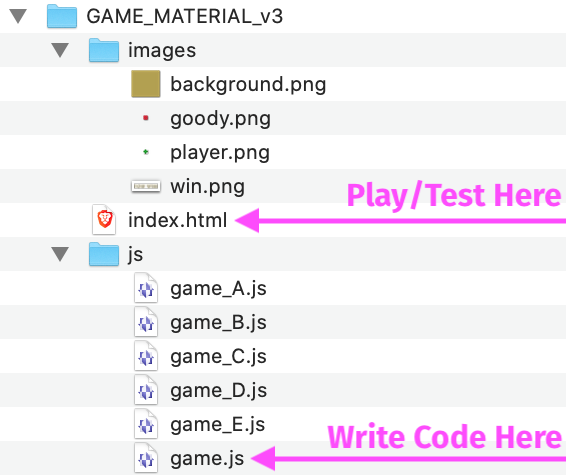
I provide the HTML base file (index.html) as well as the pictures (in the images/ folder). Have a look at the HTML and CSS to make sure you understand how it is built and how elements are used. For example, the touch buttons are invisible, but they are there; their properties are clear in the css.
All the code in this tutorial is JavaScript. You need to write this code in a file called game.js inside the js/ folder. This file is empty in the package, use it.
I have included every development state as a separate file as well. Refer to these files in the js/ folder if you are not sure what the program should look like while you work.
The order of the code is important. I indicate in the instructions where to insert the different parts, so pay attention.
Technically, you do not need to include the comment lines in your game code. But it is of course a good idea to do so. It will make your program more readable, and easier to update into a finished game after you complete the tutorial.
You can test the mobile touch interface using Chrome’s developer tools. Or you can of course use your phone. But I find it easier to test on the computer while I develop.
You will find a finished game here. The goal of the game is to grab the goodies. Your player (green circle) must move to collect all three goodie (red squares) for you to win. Of course this is basic. But building this will teach you some elements of game programming. You will be able to build almost any game or complex app from this very basic system.
The tutorial is separated in 5 steps I call States. Each state builds parts of the system. At the end of each state, you can test your game. Many parts need to be rewritten as you move from state to state. Pay attention to my instructions, they tell you where to write each piece of code, and what to replace or change.
Now, let’s build a game!
STATE A — DRAW THE ELEMENTS
In the JS file (game.js), the first thing we do is to create the canvas, and dump it in the DOM. The canvas is going to have the same dimensions as the window. Write the following code at the top of your game.js file, which should be empty before you start.
For this first state, you will write every code segment in the order that they are presented.
// Create the canvas
var canvas = document.createElement("canvas");
var ctx = canvas.getContext("2d");
canvas.width = document.documentElement.clientWidth;
canvas.height = document.documentElement.clientHeight;
document.querySelector("#gameBox").appendChild(canvas);
Next, we will load the sprites. We need four: background, win frame, player, goody.
Because we deal with images, we need a system that will only place the picture once it is loaded. So we need a variable for each picture that is only true when the picture is ready. Those are bgReady, winReady, etc. This makes sure that we do not draw a broken image or half a sprite.
//Load sprites
// Background image
var bgReady = false;
var bgImage = new Image();
bgImage.src = "images/background.png";
bgImage.onload = function () {
    bgReady = true;
};

// Win frame image
var winReady = false;
var winImage = new Image();
winImage.src = "images/win.png";
winImage.onload = function () {
    winReady = true;
};

// Player image
var playerReady = false;
var playerImage = new Image();
playerImage.src = "images/player.png";
playerImage.onload = function () {
    playerReady = true;
};

// Goodies image
var goodyReady = false;
var goodyImage = new Image();
goodyImage.src = "images/goody.png";
goodyImage.onload = function () {
    goodyReady = true;
};
We will need a few functions to get us started.
First a loop function that will be called constantly to keep the game going. This is an important function that we will build progressively throughout the tutorial. It will contain everything that must happen while the game plays. But at this stage all it’s going to do is call the render() function to draw the elements. (We define this render() function at the next step.)
Notice that the function calls the command to loop window.requestAnimationFrame(main); and provides itself as the loop function.
// The main game loop
var main = function () {
    render();
    window.requestAnimationFrame(main);
};
So now we need the render() function called by main(). This is used to draw the elements.
For now, we only have the player and one goody, and we place them at a static position on the canvas. We just want to be sure our pictures load properly. This function will also draw a text label that we will use to test and track our stuff later.
Note that we check that the pictures are loaded (using bgReady, playerReady, etc.) before we draw them on the canvas. This prevents errors and issues.
// Draw everything
var render = function () {
    if (bgReady) {
        ctx.fillStyle = ctx.createPattern(bgImage, 'repeat');
        ctx.fillRect(0,0,canvas.width,canvas.height);
    }
    if (playerReady) {
        ctx.drawImage(playerImage, 100, 100);
    }
    if (goodyReady) {
        ctx.drawImage(goodyImage, 200, 200);
    }

    //Label
    ctx.fillStyle = "rgb(250, 250, 250)";
    ctx.fillText("Game on!", 32, 32);
};
The last thing we need before testing: activate the loop. This command must be written at the end of the file; it is run after everything else is loaded in memory and it starts the game.
You’ll notice that it is the same command that we wrote in main(). But here it is the first time that we call it to start the game. It will be called around 60 times per second after this. This means our game will idealy run at 60fps.
//Start the gameplay
window.requestAnimationFrame(main);
Now it’s time to test state A!
Open the index.html file in a browser to see if it works. You should see the green player and a red goody.
STATE B — DRAW THE DEFAULT LAYOUT
We will create some programatically controllable objects for our sprites. This is just an easy way of dealing with the placement and collisions for later. You control an abstract or invisible placeholder – like a ghost of the sprite – and you draw the sprite at the coordinates of the ghost’s location.
These objects are just logical, they never appear in the game, they are used only for calculations.
We will create one player and three goodies. Note that we only need a single image to generate as many goodies as we want. That’s the power of sprites! No need to reload the image.
Location: Write the following just above the main() function, below the images.
// Create global game objects
var player = {
    speed: 5, // movement in pixels per tick
    width: 32,
    height: 32
};

var goodies = [ // this is an array
    { width: 32, height: 32 }, // one goody
    { width: 32, height: 32 }, // two goodies
    { width: 32, height: 32 }  // three goodies
];
Instead of starting the game with the loop right away, we will add an init() function that will set the stage before the game loop starts. This will let us place the objects in the right location before the beginning of the game. We place the player in the middle and the goodies randomly.
Note the references to x and y. These are the coordinates of objects on a cartesian plane. The x is horizontal, and the y is vertical. You should be familiar with this by now.
Location: You can write this function following the objects in the previous step.
//Set initial state
var init = function () {
    //Put the player in the centre
    player.x = (canvas.width - player.width) / 2;
    player.y = (canvas.height - player.height) / 2;

    //Place goodies at random locations
    for (var i in goodies) {
        goodies[i].x = (Math.random() * (canvas.width - goodies[i].width));
        goodies[i].y = (Math.random() * (canvas.height - goodies[i].height));
    }
};
Now that we have determined the initial state of our game board, we need to update the render() function so it places the sprite images at the right place. This will also allow for movement later as the render() will be refreshed at every loop.
Location: Replace the playerReady and goodyReady condition blocks of your render() function with:
if (playerReady) {
    ctx.drawImage(playerImage, player.x, player.y);
}
if (goodyReady) {
    for (var i in goodies) {
        ctx.drawImage(goodyImage, goodies[i].x, goodies[i].y);
    }
}
One last thing: we must call the init() function just before we start the loop.
Location: At the bottom of the file, right above the last line, add:
init();
Test state B!
You should see the player in the centre and three goodies randomly distributed on the board. If you refresh, the goodies are going to appear at different places.
Note that this code is simple and can be a bit buggy. It is possible that you see only one or two goodies from time to time. This happens when a goody is randomly placed by init() in collision with the player triggering its removal right away. Don’t worry about this. If it happens, refresh, you should get three goodies.
STATE C — ADD INTERACTION
To make the game playable, we need to handle the keyboard and touch events so we can move the player according to the user’s input. To do this we must first create variables for the velocity of the player. This will determine which direction it goes.
Location: The next three blocks of code should be inserted, in order, just below the global objects created in State B (player and goodies).
// Velocity variables
var vX = 0;
var vY = 0;
Now, we can write the handlers for the keyboard.
We create an event listener that will trigger when the keyboard is pressed. The keyCode numbers refer to the code of each key: 38 is the up arrow, 40 is the down arrow, etc.
When the user presses an arrow key, the player starts moving in this direction at the speed set in the player object (5 pixels).
Note that, in this tutorial, the player starts to move when you press the key and continues to move on its own. It does not stop when you release the key. (It bounces on the edges of the canvas; we’ll do this later.) This is to make the mobile interface easier to handle. You can, in your game, change this. You can stop the player with the spacebar.
// Handle keyboard controls
addEventListener("keydown", function (e) {
    //Keystrokes
    if (e.keyCode == 38) { // UP
        vX = 0;
        vY = -player.speed;
    }
    if (e.keyCode == 40) { // DOWN
        vX = 0;
        vY = player.speed;
    }
    if (e.keyCode == 37) { // LEFT
        vX = -player.speed;
        vY = 0;
    }
    if (e.keyCode == 39) { // RIGHT
        vX = player.speed;
        vY = 0;
    }
    if (e.keyCode == 32) { // STOP spacebar
        vX = 0;
        vY = 0;
    }
}, false);
Next, we need to add the controls for the touch events in the case of mobile playing. In this case, we will refer to the ID of the buttons from the HTML code to find the touch target. (See index.html for reference.)
The target refers to the element that was touched by the user to trigger the touchstart event.
// Handle touch controls
addEventListener("touchstart", function (e) {
    if (e.target.id == "uArrow") { // UP
        vX = 0;
        vY = -player.speed;
    }
    else if (e.target.id == "dArrow") { // DOWN
        vX = 0;
        vY = player.speed;
    }
    else if (e.target.id == "lArrow") { // LEFT
        vX = -player.speed;
        vY = 0;
    }
    else if (e.target.id == "rArrow") { //RIGHT
        vX = player.speed;
        vY = 0;
    }
    else { // STOP This stops if you touch anywhere else
        vX = 0;
        vY = 0;
    }
});
Now we will update the main loop function so it handles the movement of the player object. We need to change the movement direction of the player according to the key or the button that is pressed.
You will notice that we also make sure the player does not go outside of the canvas by making it bounce back in the opposite direction when it hits an edge.
Location: Add this code before the render(); command inside your main() function.
//move player
if (player.x > 0 && player.x < canvas.width - player.width) {
    player.x += vX;
}
else {
    player.x -= vX;
    vX = -vX; //bounce horizontal
}

if (player.y > 0 && player.y < canvas.height - player.height) {
    player.y += vY
}
else {
    player.y -= vY;
    vY = -vY; //bounce vertical
}
To make sure everything is OK, we will print the coordinates of the player in the text label we created early on.
Location: Replace the line with fillText (inside the render() function) to this:
ctx.fillText(player.x+" "+player.y, 32, 32);
Test state C!
You should be able to move the player using the arrow keys or by touching the buttons at the edge of the screen on a mobile or in your browser’s developer tool.
The coordinates of the player object should appear in the label at top left of the canvas.
STATE D — COLLECT THE GOODIES
In order to be able to collect the goodies, we need to do a collision test. So let’s build a function that tests whether two objects touch each other.
I wrote this function in a compact style. You do not need to understand all of it at first. It takes two objects which have coordinates and dimensions, and returns true of they collide. You can use this function later for any two objects in any other similar project.
Location: You can write this function after the render() function, before the init(); call.
Make sure you write this one precisely, it is quite compact and every character is important.
//Generic function to check for collisions
var checkCollision = function (obj1,obj2) {
    if (obj1.x < (obj2.x + obj2.width) &&
        (obj1.x + obj1.width) > obj2.x &&
        obj1.y < (obj2.y + obj2.height) &&
        (obj1.y + obj1.height) > obj2.y
        ) {
            return true;
    }
};
So let’s remove each goody when the player has touched it. In the main() function, we will add a new for loop that checks for collisions between the player and each of the 3 goodies.
When a collision is found true, we remove that goody from the array. (The splice command removes an element from the array.)
Location: This must be inside the main() function, before the render(); call.
for (var i in goodies) {
    if (checkCollision(player,goodies[i])) {
        goodies.splice(i,1);
    }
}
Again for testing purposes, we will add a counter to the text label. So, again update the fillText line with this:
ctx.fillText(player.x+" "+player.y+ " "+goodies.length, 32, 32);
Test state D!
The red goodies should disappear when you hit them with the player. Also check the counter in the text label.
STATE E — WIN!
The last thing we need is to show when the user wins or catches all the goodies. For this we will need to check how many goodies are left in the array, and when we reach 0, we show the win frame.
We will build a checkWin() function which will be called from the loop and returns false as long as there are goodies in the array.
Location: Write this after the collision test, before the init(); call.
//Check if we have won
var checkWin = function () {
    if (goodies.length > 0) {
        return false;
    } else {
        return true;
    }
};
We now need to add a call to this function in our main loop. In the end, the main loop has two parts:
- what to do when you win: show win frame
- what to do up to that: play the game
So far, the main() function has only behaved as if we had not yet won, so all the code that is there at this stage will be in the second part. The first part is the new code that runs when we win. To make it simpler for you, I have re-written the whole function below.
Location: Replace your whole main() function with this:
// The main game loop
var main = function () {
    if (checkWin()) {
        //WIN display win frame
        if (winReady) {
            ctx.drawImage(winImage, (canvas.width - winImage.width)/2,
                (canvas.height - winImage.height)/2);
        }
    }
    else {
        //Not yet won, play game
        //move player
        if (player.x > 0 && player.x < canvas.width - player.width) {
            player.x += vX;
        }
        else {
            player.x -= vX;
            vX = -vX; //bounce
        }
        if (player.y > 0 && player.y < canvas.height - player.height) {
            player.y += vY
        }
        else {
            player.y -= vY;
            vY = -vY; //bounce
        }
        //check collisions
        for (var i in goodies) {
            if (checkCollision(player,goodies[i])) {
                goodies.splice(i,1);
            }
        }

        render();
        window.requestAnimationFrame(main);
    }
};
Finally, we will make the text label more useful to the user rather than the programmer.
Change the fillText line to this:
ctx.fillText("Goodies left: "+goodies.length, 32, 32);
Test state E!
The game should be complete, you should see the win frame when you catch all the goodies. Again, this is a bit buggy, the win frame does not completely cover the canvas, so sometimes you see the player, sometimes you don’t when you win. No worries, you will fix these little details as you complete the game.
You’ve written a game system!
The next step is for you to design a game around it…
To recap, the code contains three general parts you should be familiar with:
- Game variables and interface controls
- Principal functions: init(), main(), render()
- Other functions
The three principal functions do the following:
init() • This sets the stage, determines the initial position of sprites, and sets the starting parameters of the game. This function is called only once, at the very beginning. If you want the goodies to start at the top and fall down, for example, you have to place them at the top of the canvas in the init() function.
main() • This is the game loop, it makes calculations for the movement of sprites and handles the progress of the game: how many goodies we have left, where are things, etc. This function is called up to 60 times per second by the requestAnimationFrame() command. Following our example, here you will determine the movement of your falling goodies along the Y axis. It is also here that we check for collisions.
render() • This draws or paints the canvas. Everything the user sees while playing the game is drawn by this function according to the values determined by main(). This function is also called by main(), so it also runs close to 60 times (or frames) per second. This is where each goody will be painted on the canvas for each frame giving the illusion of them falling from the top.
Although there are many elements already included in this tutorial, and some more I will show you, you will probably want to add or change stuff to customize your own game according to your design document and desired features. You may need to figure out how to deal with baddies (which your player must avoid), or you may want the goodies to move, or you may even want to make goodies or baddies appear, maybe at random, etc. As long as you are familiar with the logic of the system, you can do anything with this game.