Hugo’s Sprite Sheet Animation Tutorial v2.0

Today, you will build an animation based on a sprite sheet.

Introduction

Any media that shows movement does so by displaying a collection of static images in series at a rate that allows the brain of the viewer to imagine movement. There is no movement. The movement is an illusion, it comes from you, the viewer, from your brain.

Frame-by-frame animation is the oldest animation technique. This is how the first animations were created. An artist draws a series of images containing slightly different position of elements. When the images are shown quickly one after the other, it looks like the stuff in the images moves. I believe you have created such an animation in a class last semester.

This is a Japanese film from 1907 known as Katsudō Shashin (活動写真). In the rendition below, which shows the loop a few times, you can clearly see how it is built from multiple static images or frames. This animation has 50 frames meant to be played at 16 frames per second. (Each loop lasts a little over 3 seconds, if you count.) More info here, if you’re curious.

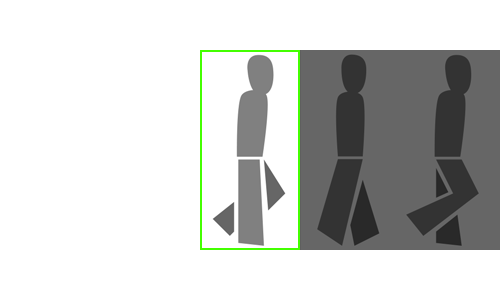
The animation you will create in this tutorial is also a frame-by-frame animation – rapidly flipping static images or frames – but we will put all the different moments of the animation, all the frames, in a single image file. This image is called a sprite sheet. A sprite is a single pose or moment in an animation image series. It can be called a state. Sprites are collected on a sprite sheet. Sprite Sheets are used in games and other interactive products because they make it easy to manage the different states of an asset (image, icon, button, character, etc.).

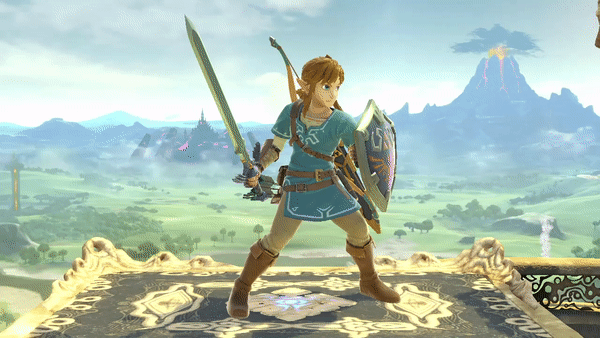
Example. When your character moves in a third-person video game, like Zelda, the animation is usually done with a sprite sheet. Each position of the character during the idle movement or walk cycle is a single image in a sheet of many images. And the camera (if you will) shows only one at a time in a loop. Since the early days of arcades, video games have used sprite sheets like that to store character poses and animate them.

In the example below, you see Link’s idle pose. This is made with sprites. (Link is the name of the player character in the Legend of Zelda series of video games published by Nintendo.) In this case the sprites are 3D models instead of flat images, but the idea is the same. (Please let me know if this file ever disapears, it is hosted externally.)

Following the steps below, you will create a character’s walk cycle. It will be designed with a sprite sheet, and it will be animated using CSS. The finished product is something like this:

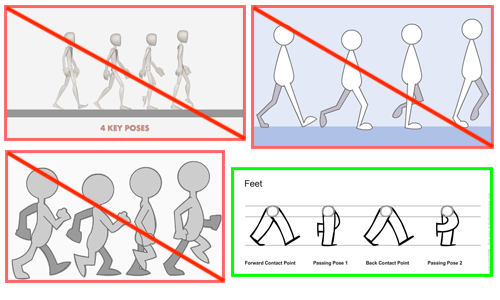
The sprite sheet for this animation looks like the following. It is a typical four-frame walk cycle. Note that I have made the head bobble, but I do not discuss this in the tutorial. You can figure it out. :-)

In this tutorial, you will use Illustrator or Photoshop (or any other tool) to draw the character, and Photoshop to prepare the sprite sheet. (I assume you know Photoshop.) You will also write very basic HTML and some CSS code to animate your character.

Read the whole thing once before you start creating the animation. If you have issues with certain parts, talk to me.

Now let’s build an animation!

Part 1 — The Walk Cycle

As you have probably guessed by now, a walk cycle is a looping animation that gives the illusion of a character walking. There are many different types of walk cycles. For this tutorial, and for the animation you will eventually create, I want you to keep it simple.

The walk cycle we will use has four poses. It depicts a character walking in profile from the viewer. It can go in either direction. But it is a straight profile (this means the character looks straight left or right of you, you see one shoulder and one ear, not the face). You need to get familiar with the poses in order to create the illustrations of your character in each pose.

What differentiates the poses is the position of the legs. There are four separate positions for each leg. Both legs do the same positions, but at different times. (The movement of the legs is a bit like a canon, for those who know music theory.) In my descriptions, I will distinguish the legs by calling the one closest to the viewer the near leg, and the other the far leg.

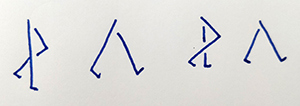
Staight near leg • Bent far leg

In this pose, the near leg is straight down. The far leg is bent so you see the knee on one side, and the foot on the other side. It is important that the far leg is fully crossing the near leg.

Back near leg • Forward far leg

The next pose has both legs forming a triangle from the hip. The near leg has to be in the back of the character (left side in this direction), and the far leg in front.

Bent near leg • Staight far leg

The next pose has the far leg standing straight, and the near leg bent. Again, the knee and foot of the near leg have to be on either sides of the far leg.

Forward near leg • Back far leg

Finally, this pose has the legs crossing again, forming a triangle, but this time the far leg is in the back.

I strongly recommend you make several small sketches of the leg positions to assure you are familiar with the poses before you draw your character. Note that you need to give heft and dimension to your legs. This animation does not work with matchstick legs. Notice in the sketches below how I show dimension by ‘hiding’ parts of the far leg.

I find that following a single leg at a time makes it easier to understand the movement.

A few important things to consider. It is very important that the legs are drawn so the hips join at a single point. If your legs are not joined at the hips properly on every pose, the motion will not work. So always draw your legs from a single hip point. Make sure also that the legs are all the same length. If you look at my sketch above, I made the different poses different sizes. For a sketch, it is ok, but if I wanted to animate this, I would have to fix the lengths.

If you want a slightly different point of view on the four-frame walk cycle, check out this Wikipedia page. You can also look at this short test video. Be careful of what you find online! This is important. There are many images online that call themselves “walk cycle” but which are NOT useful for this assignment. Unless you know what you are doing, please stick to what I mention and link in this tutorial. These three popular images students often find online are NOT useful for this exercise. It is not that they are wrong, only they depict the four key poses of an 8-frame walk cycle. It would be great if we were to create such an detailed animation, but we are not. The image on the bottom right is fine. But please focus on my examples.

Your turn: draw a character, in the four poses. You can use Illustrator or Photoshop, or anything really. The idea is to make sure you draw your character in four poses that have the same size.

Note that you need to do a 2-legged character. This will not work with a cat. You need more than four frames to animate a cat’s, or a dog’s, or an elephant’s, or a spider’s, or Sleipnir’s walk. Birds are also difficult. Any humanoid character is fine, or an anthropomorphised creature, as long as it walks on two legs. Of course, humans are good. Bipedal aliens are also popular.

Part 2 — The Sprite Sheet

The Photoshop file

The working principle of the sprite sheet is that each segment divides an image in precisely equal parts. In our case, we need to make a sprite sheet with four sprites: one for each pose. This means that we need to divide an image in four equal parts.

An easy solution is to create an image file of a width that is easy to divide in the number of sprites. In our case, four. Keep in mind that the image file will contain 4 different images: one for each pose of the character. It’s like stiching together images. Each image, or segment of the sprite sheet, or sprite, must be contained completely within its segment. You cannot have parts of the drawing cross in the other sprites, otherwise, you will see them in the animation.

So, create a new image in Photoshop with a width of 800px (this will make four segments of 200px each). The height is less important. You should make sure you will be able to fit your entire character in it. But the exact value does not interfere with the method because all sprites will have the same height.

Make sure the rules are visible. (Cmd+R | Ctrl+R)

We will place three vertical guides to delimit each sprite segment. (You pull the guides from the rule.) Place a first guide at 200px (this is the first segment). The second guide at 400px. The third guide at 600px. (You can press Shift while moving the guides which makes them snap to simple values.)

Remember this: our sprite sheet is 800px wide, each sprite will be 200px wide, so our final animation will be 200px wide.

Save your file.

The Sprites

Now that we have a container for the sprite sheet, you will need to insert your sprites. Whatever you used to draw your character in four poses, you now need to bring them to this file. You can copy/paste from Photoshop, from Illustrator, or from pretty much anywhere. It is easier if you have each sprite on a separate layer. So bring each pose as a separate element.

Make sure you place each pose in the centre of its segment.

And make sure no piece of a sprite crosses over to another segment.

Export sprite sheet

Make sure you save your PSD file first.

We need to export this document to a PNG or JPG image that you can use on the web. I assume you know how to do this.

Save your file.

Part 3 — The Animation

The last step here is to bring the sprite sheet image in an HTML file, and animate it using CSS.

You can put your animation anywhere your want. But it needs two pieces of code: 1. a DIV or some container to hold the image, and 2. a few lines of CSS.

The HTML container

To test and make sure it works, simply create a plain HTML file. Use your editor’s shortcut, or copy from a file you already have.

In your HTML file, in the body, you need an element like this:

<div id="walk"></div>

This element should be empty. The sprite sheet will be loaded as its background using CSS.

The basic CSS

The first part of the CSS sets the div to the proper dimensions and assigns the sprite sheet as the background.

If you recall, just above, we have created a div with the id "walk". The css is then super simple. Put this code inside a <style> tag in your <head> element.

#walk {
    margin: auto;
    width: 200px;
    height: 400px;
    background: url("img/spritesheet.png");
}
        

Notice that the width is set to 200px (the width of a single segment or sprite), and the height is 400px (the height of the image). Note as well that this assumes the image is called spritesheet.png and it is in a folder called img/. Of course, you must adapt these to your values.

With this you should see, in the html file, the first sprite. We need to animate it.

The animation CSS

In order to ‘move’ the background of the div, we need to create a CSS animation. I believe you have done this in a previous web class. In any case, I will explain it here again because we need to make a special case of animation.

Before we go further, let’s make sure we understand what is going to happen here. The whole sprite sheet is going to form the background of the div, but the div will only have the width of 1 segment. So the div will serve as a mask, only letting one segment show at any given time. The background sprite sheet will sort of move behind the mask. See the image below for a visual representation of this analogy: in this animation, the green outlined rectangle represents the <div>, and the sprite sheet moves behind it. The greyed out segments will not show. The mask will only show one sprite at a time. I made this as a GIF to show you how it works behind the scenes. This is not the animation we are creating.

OK, we already have the css that sets the image as the background. Next we will create the animation.

In CSS, an animation starts with a keyframes block. What we want is to change the position of the background from its initial location to a position translated left by the width of the whole image. So the from frame will set the position to 0px. And the to frame set the position to -800px (the width of the sprite sheet image). I called the keyframe set ‘play’ to keep it simple. You can of course call it something else.

@keyframes play {
    from { 
        background-position: 0px; 
    }
    to { 
        background-position: -800px; 
    }
}
        

Next we simply need to apply this animation to the div. So you need to add an animation property to the #walk rule you wrote a few steps before.

#walk {
    margin: auto;
    width: 200px;
    height: 400px;
    background: url("img/spritesheet.png");
    animation: play 0.5s steps(4) infinite; /* new line */
}
        

This property takes a few values. The first one, play determines the keyframes to use; the ones we just created. The second value 0.5s sets the time of the animation: 1/2 second. (If you do the maths, each frame plays for 1/8 of a second, that’s 8 frames per second.) Short time means faster motion, long time means slower motion, and also choppier movement. You can vary this value to find the sweet spot.

The next value steps(4) is important. It makes the animation happen in steps rather than smoothly. If this option was not set, the background would move smoothly from the start to the end. But what we want is to have clear displays of each sprite, without the various positions in between. We have four frames/sprites, so 4 steps. The last value makes the animation loop forever: infinite.

There you have it. Your animation should look like this:

Now, design a cool character that follows your concept, draw the walk cycle for its legs, and create a great animation for your portfolio showcase!