Hugo’s JS Library Animation Tutorial v1.3

Today, you will build an SVG animation using a JS library.

Introduction

This animation will be built by combining two web design tools: SVG graphics and JavaScript. Scalable Vector Graphics (SVG) are vector based illustrations that are written in code that can be interpreted by a browser. If you look at an SVG file in a text editor, like Sublime or Code, you will recognize tags, just like in an HTML document. The interesting part of SVG, besides being vector so they can be scalled without worrying about resolution, is that their code can be assigned CSS properties, just like HTML. So, of course, we can use this to animate elements of an SVG illustration using JS. (And even CSS Animations! But we won’t do this here.)

The animation technique we will use in this tutorial is called tweening. The word ‘tweening’ comes from the word ‘between’. The idea is that you set the parametres of an asset at its initial state and at a destination state, and you let the computer generate the steps, or the frames, in between. It makes creating predictable movements, like translation in straight lines or scaling, super easy. All you need is where you want your objet to start, where you want it to end, and voilà!

There are different animation tools doing tweening. Actually, if you played around a bit with animations in different software, you may have noticed tweening tools. Here, we will use a JS library called GreenSock Animation Platform or GSAP. (In the the next tutorial, if you follow them in order, we use plain JavaScript to handle the tweens.)

There are plenty of other JS libraries that achieve similar results to GSAP. I chose GSAP for three reasons: 1. it is one of the oldest and most used library, 2. it is extremely stable and predictable, 3. it is highly respected and supported, it is the only animation library allowed in most web advertisement platforms. So it is a good choice. If you want, once you have explored this library, you can look at others. One of the cool up and coming ones is called Anime.js. If you know jQuery, it also includes lots of animation functions and even plugins you can play with. You are welcome to check these out. But in this tutorial, we use GSAP.

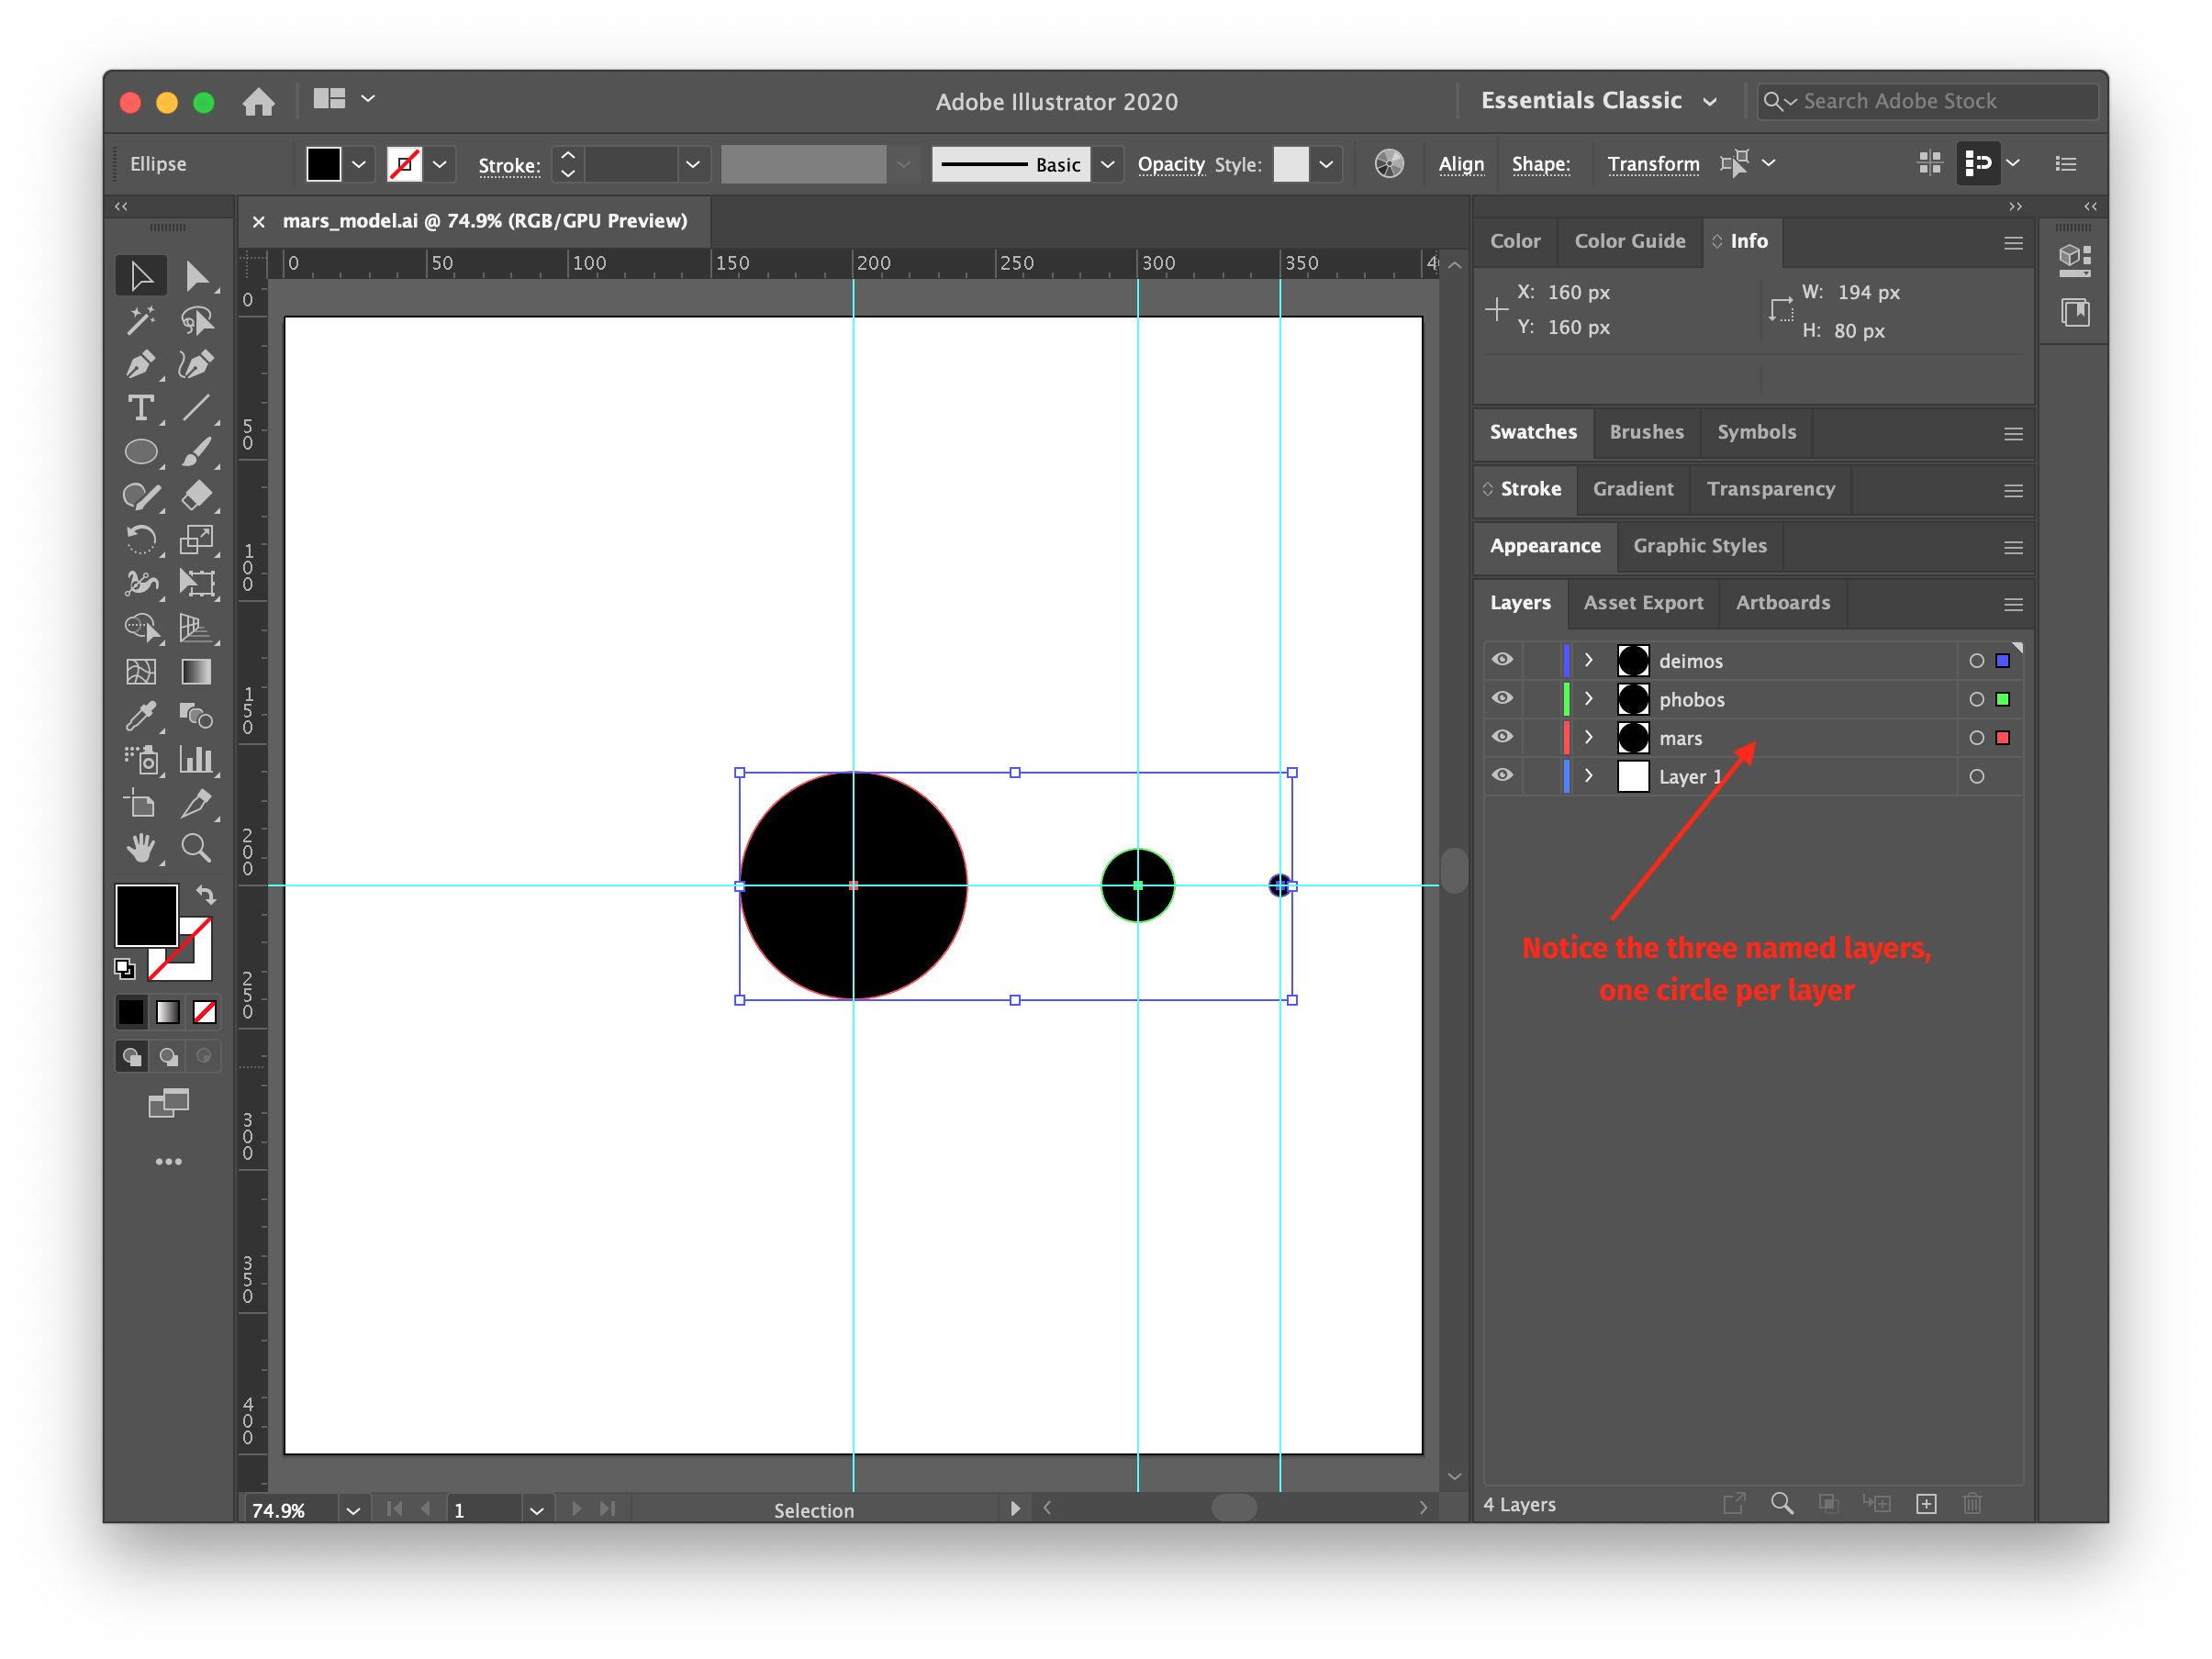
The animation we will build is a simple model of the planet Mars and its two moons: Phobos and Deimos. It will look like this. This is not a GIF, it is not a video file, it is an animated SVG illustration. In fact, if you click on it, it will pause because I wrote code to make it pause on click.

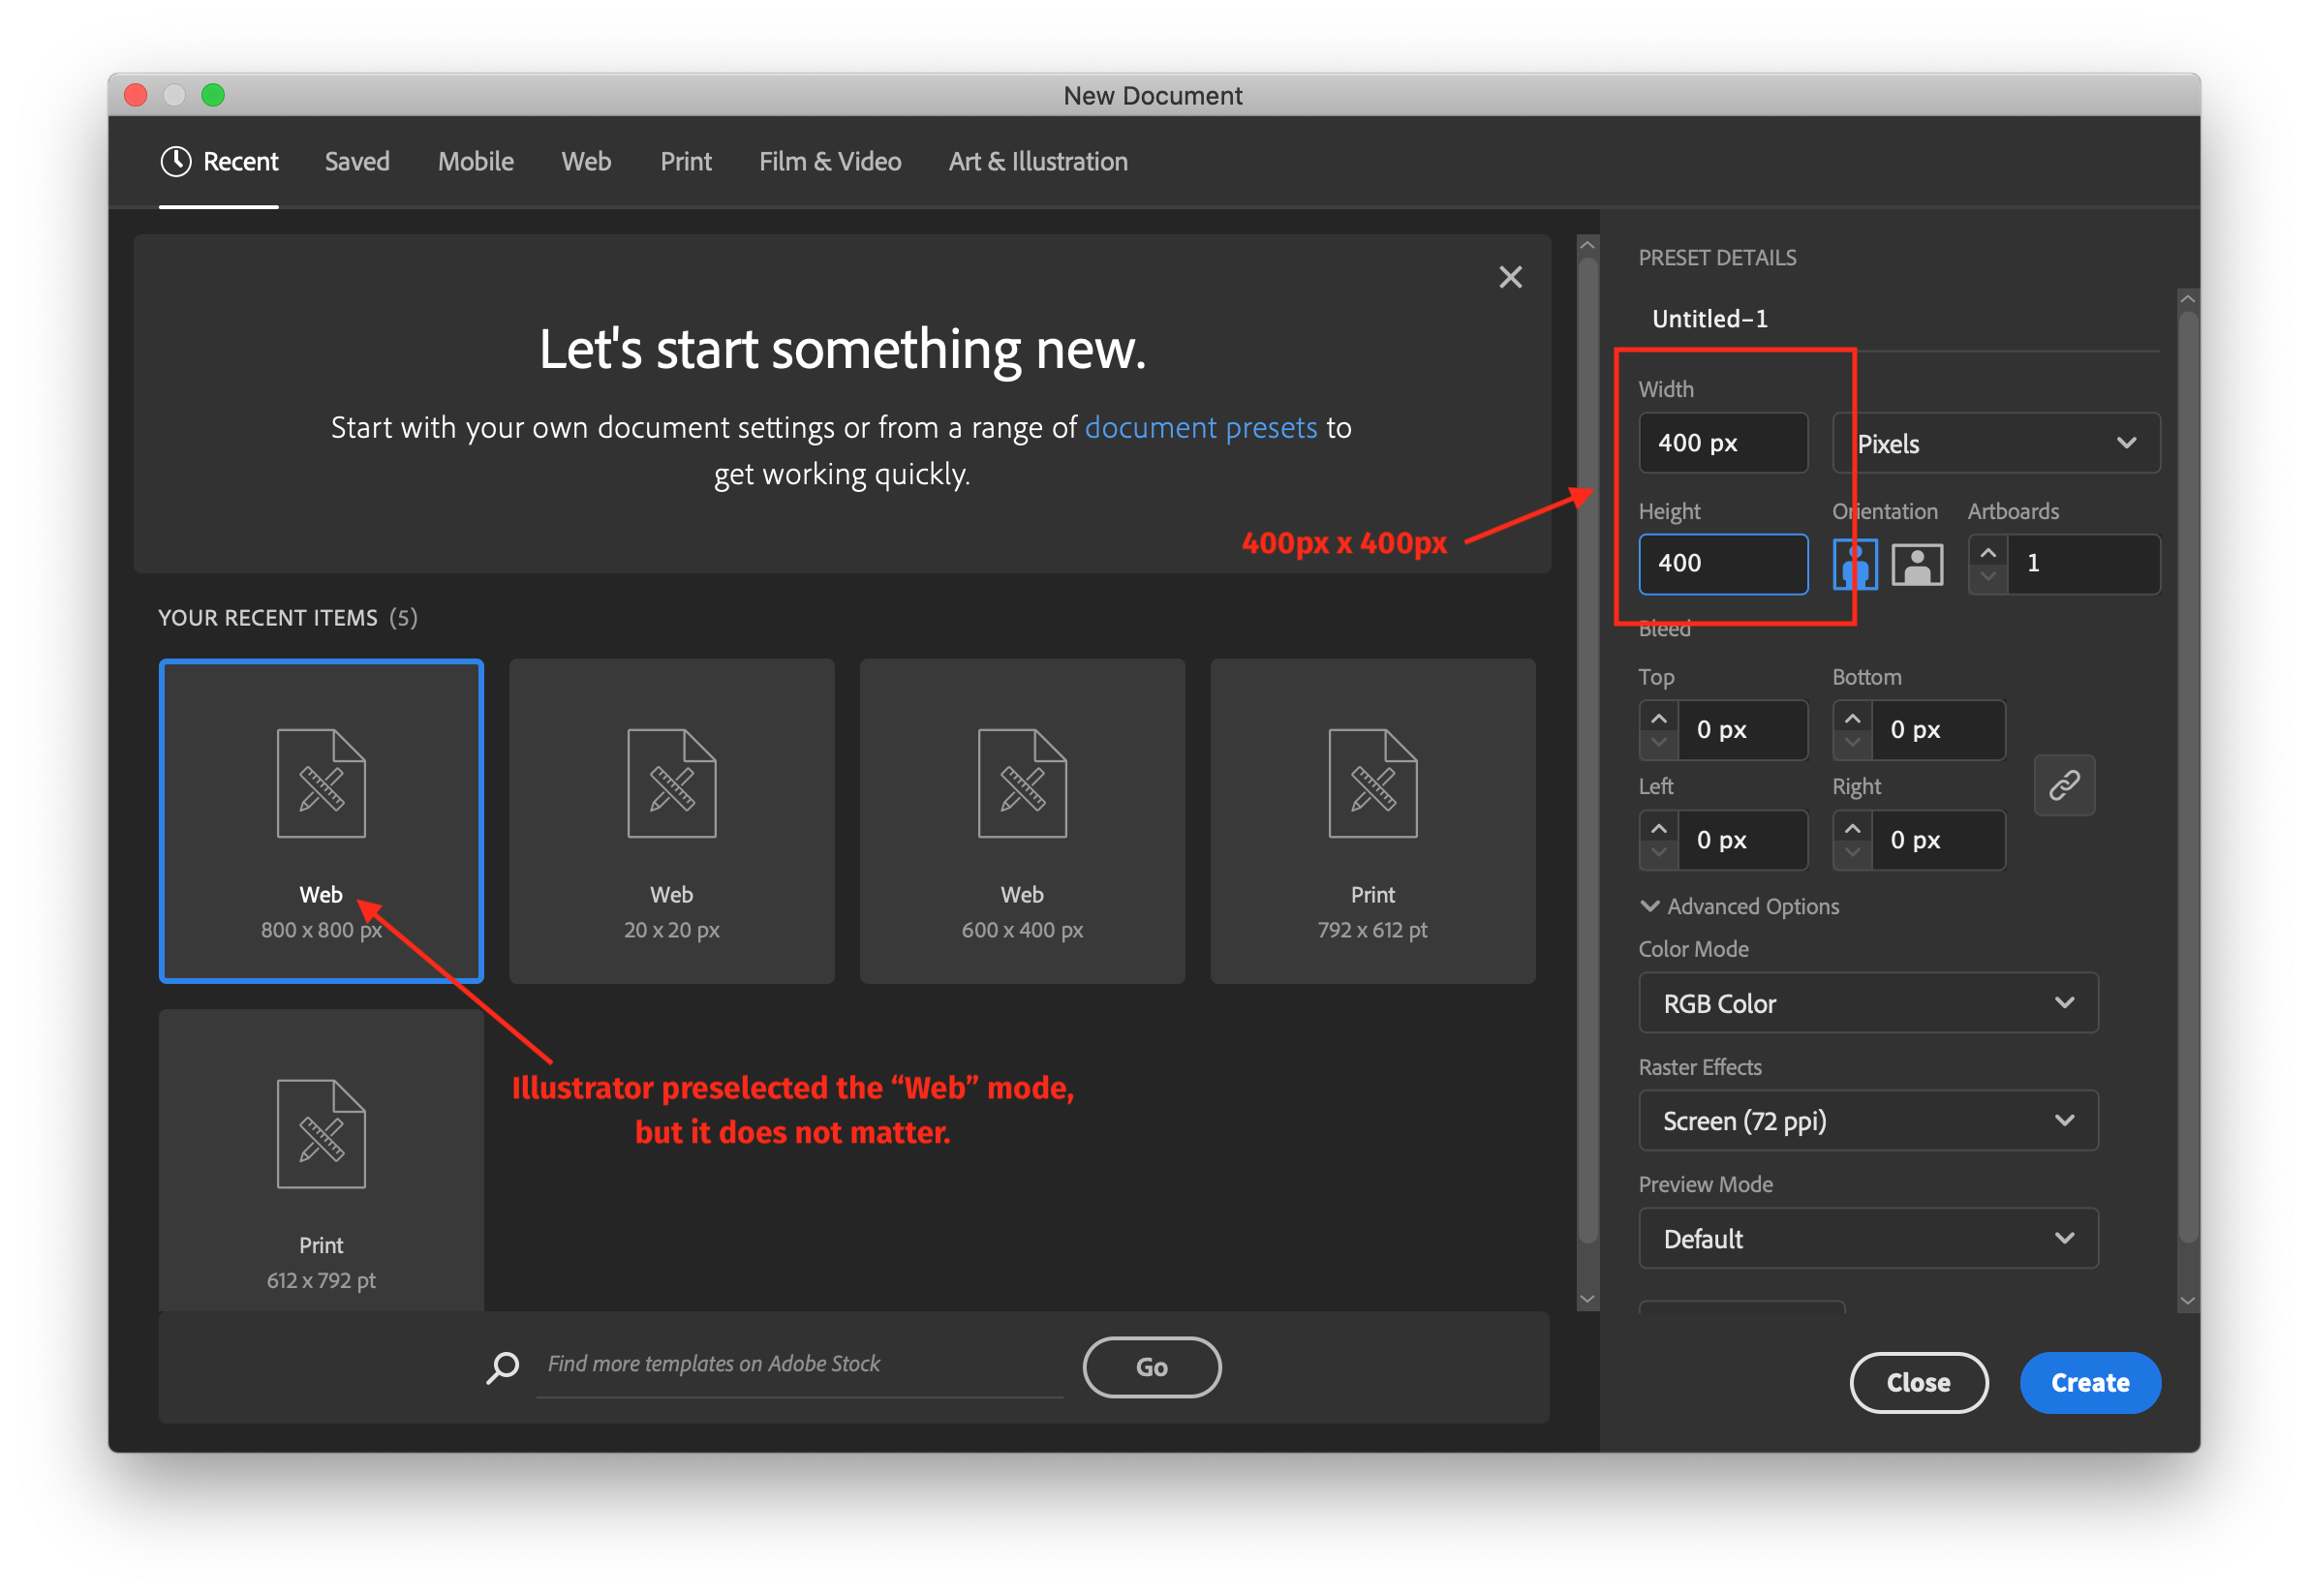
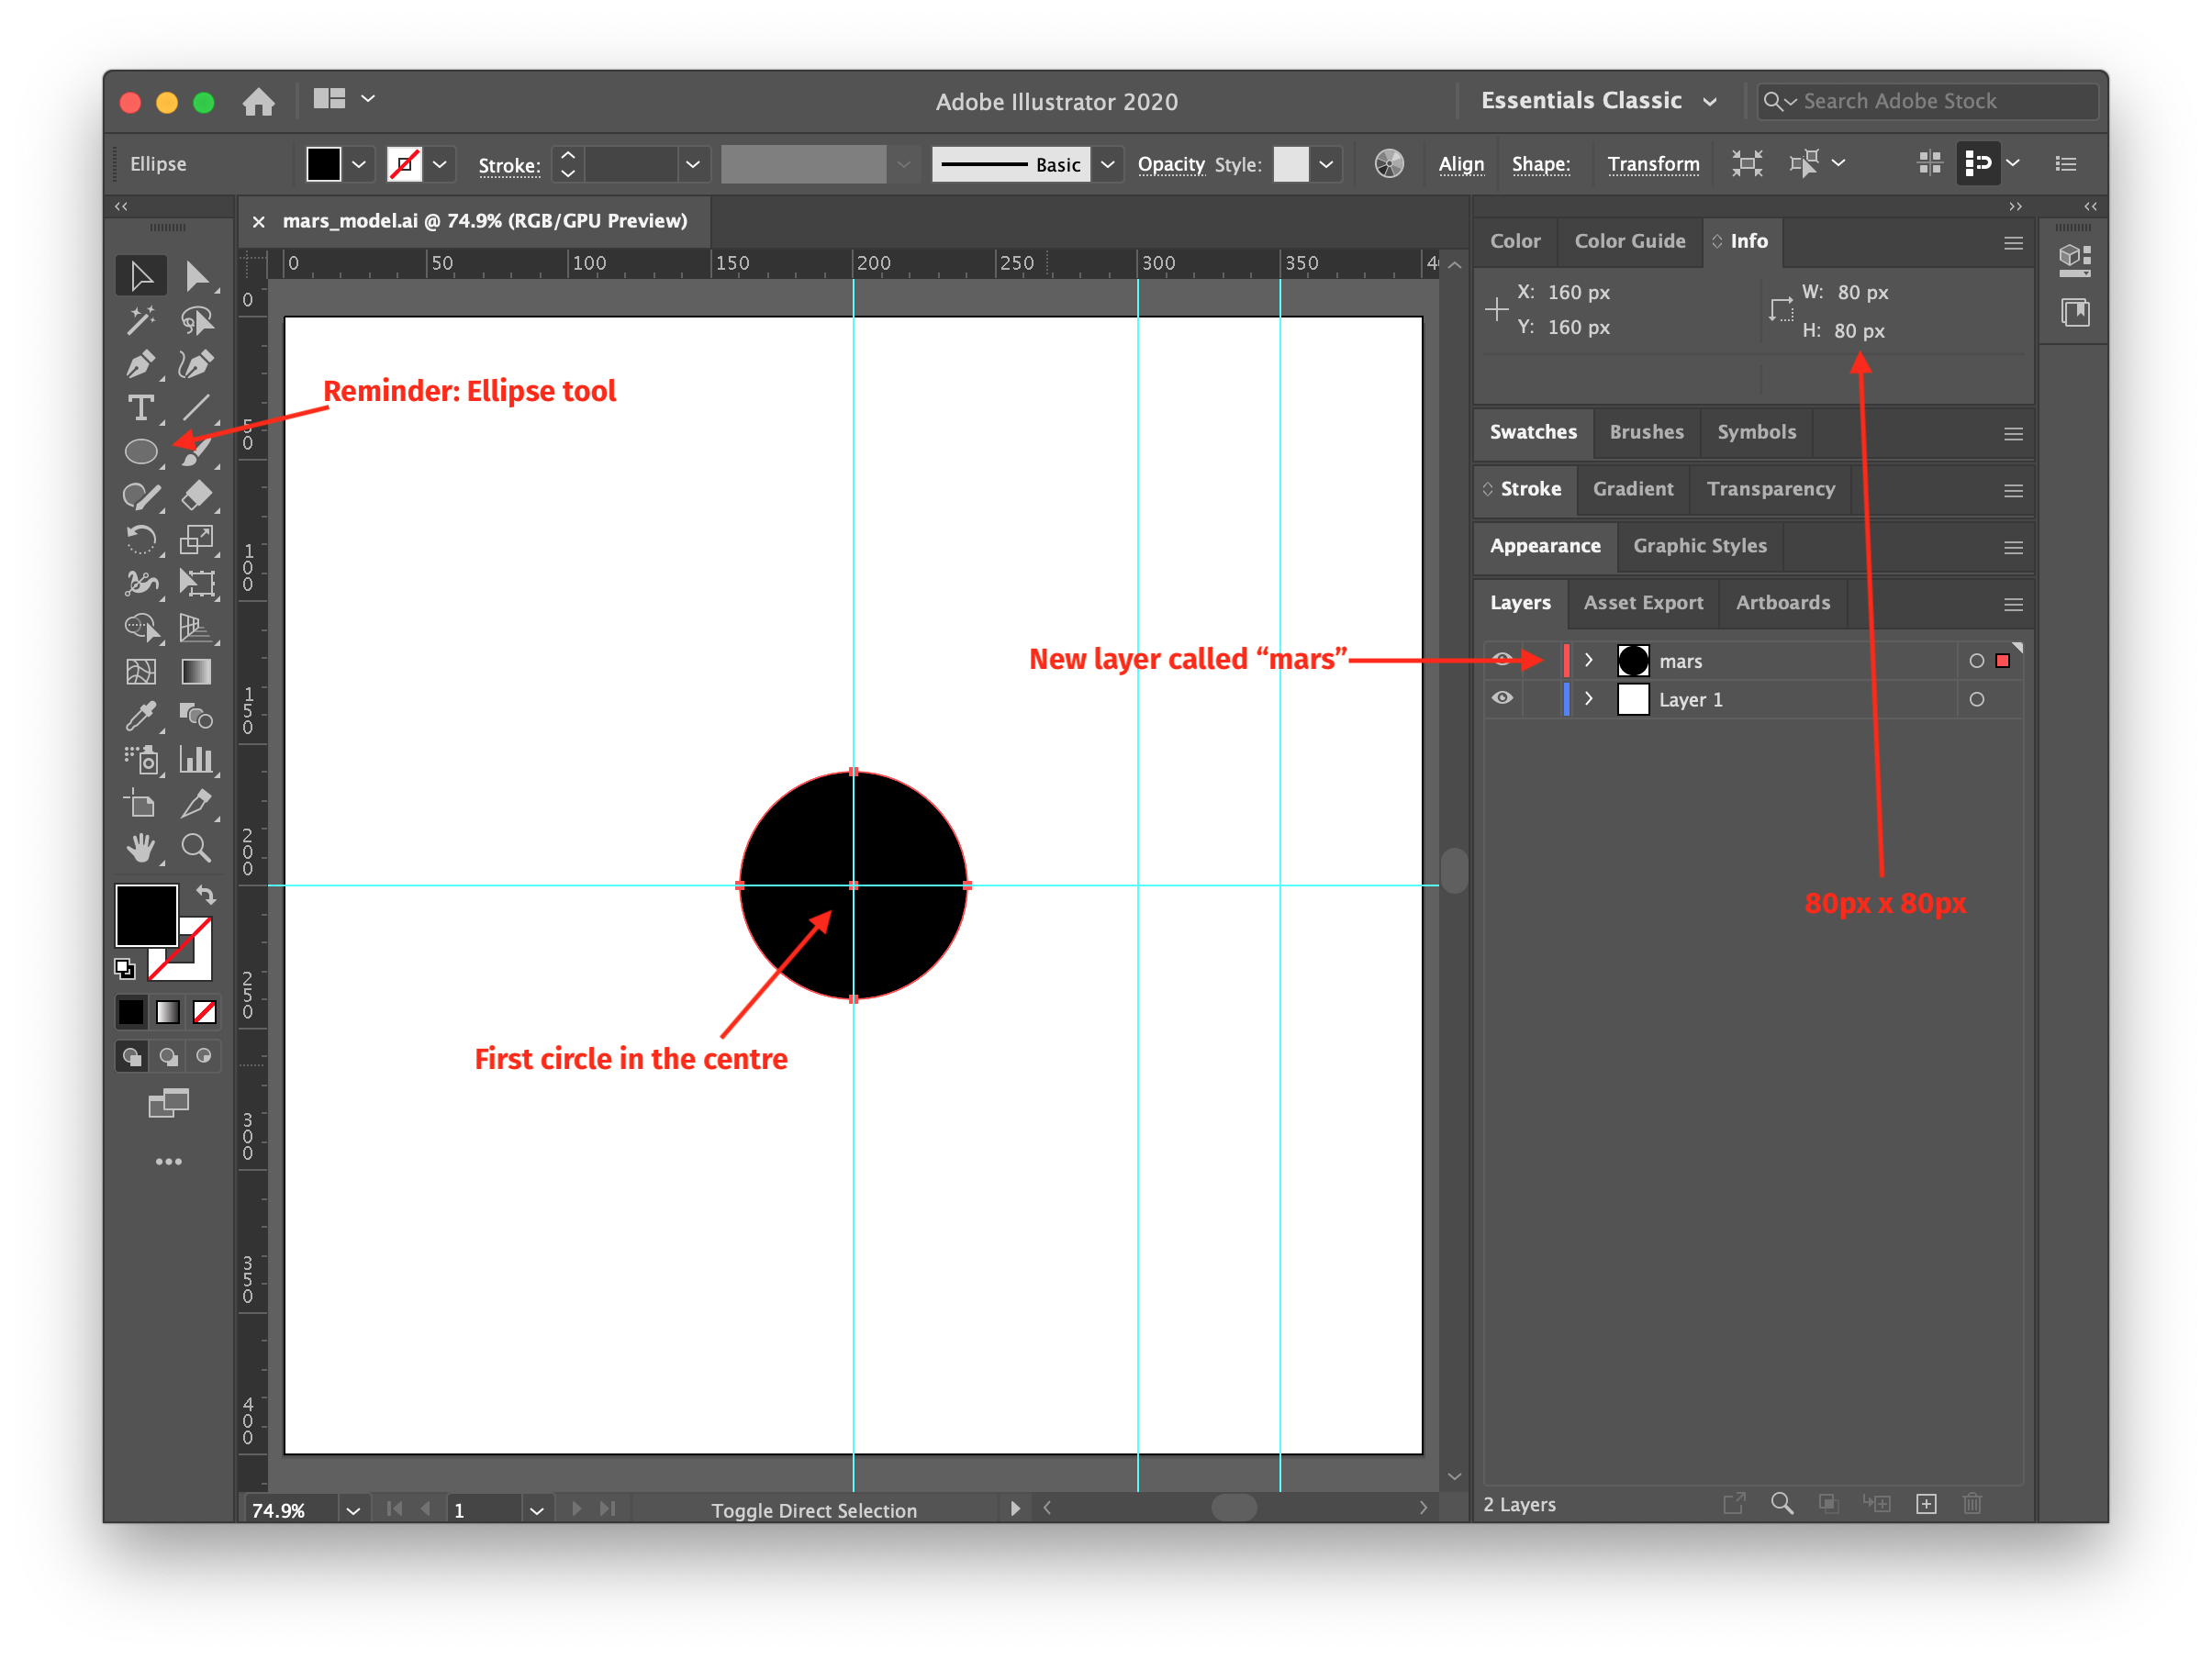
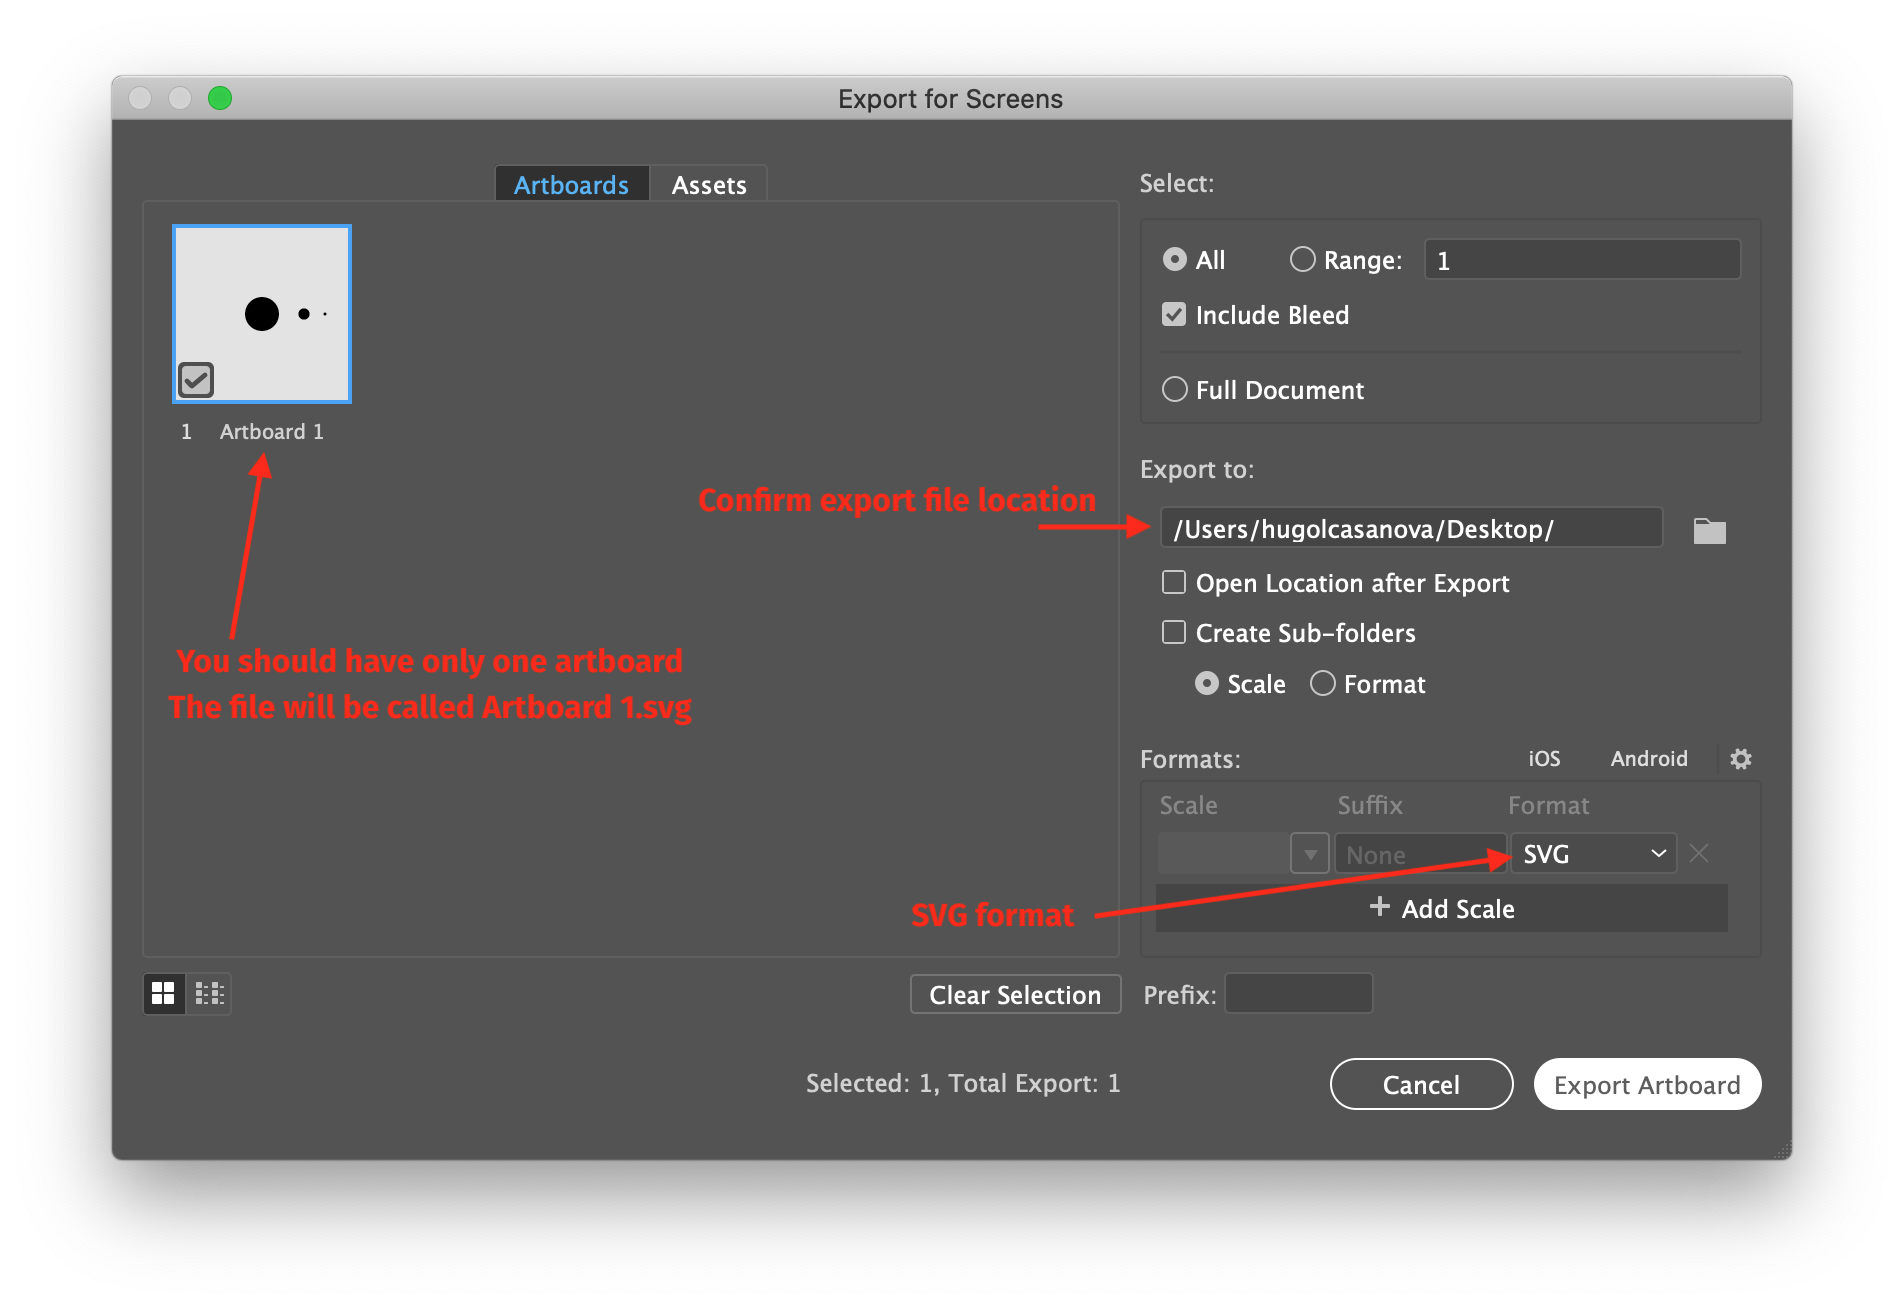
In this tutorial, you will use Illustrator to draw the static model and export the SVG. (I assume you know Illustrator.) You will also write very basic HTML and some simple JS code to animate your illustration.

Read the whole thing once before you start creating the animation. If you have issues with certain parts, don’t hesitate to contact me.

Part 1 — The Illustration

The first thing we need to create our planetary model is an illustration of the model. We will make sure that the elements that need to be animated are clearly separated so we can animate them individually. Note that since we are building a super simple illustration – just three circles – we could actually just write the code directly; SVG is easy to write like HTML. But I think you will want to make a more complex design for your showcase, so I show you how to do it with an Illustrator drawing.

Start Illustrator and create a new file. Set the file’s width and height to 400px. (These dimensions will become important later, remember this.) You can use another tool to create the SVG file, but Illustrator works well, and you know it.

The first thing we’ll do is set guides to help place the elements. Make sure the rulers are visible. (Cmd+R | Ctrl+R) Place guides like shown on the picture. (Note that I forgot to save the file before taking the screenshot. Save your file!)

The celestial rocks

Now, we will draw the planet and the two moons. It is important that you create a layer for each of the rocks: a layer for Mars, a layer for Phobos, and a layer for Deimos. Layers in Illustrator are exported as groups in SVG. And when you give a name to a layer, the group (which is a <g> tag in SVG) gets assigned the name as id: <g id="layerName">. This is useful when comes the time to animate.

Create a new layer. Call it “mars”. And draw a circle on it, placing the circle in the centre of the illustration. The diametre of the circle is not that important; I used 80px. We will colour the circles in CSS later, you should leave them black.

For this exercise, it is important that you keep this illustration as simple as possible. Please resist the temptation to customize the design at this stage. If you make complex shapes and add fancy colours, your SVG export may not work, and it may be super difficult to animate your illustration later. Once you understand how the whole thing works, it will be easier for you to figure out a complex illustration. But for now, keep it simple, like I do. Also keep in mind that SVG does not translate all the features of Illustrator. So even for your final animation, keep it simple and basic.

Next we will draw Phobos. Again, create a new layer. Call it “phobos”. Draw a circle on it. Place the circle at the intersection of the guides at 300px and 200px. The diametre of this moon in my example is 26px.

Finally, we will create Deimos. Same story: add a layer, call it “deimos”, draw a circle, place it at the other intersection, etc. This one’s diametre is 8px. (Why did I pick such random values? Because the circles in my model are made in proportional relative size to the real objects, ha!)

Your illustration should look like this (notice the three named layers):

Save your file.

Part 2 — Export the SVG

There are several ways of getting SVG code out of an Illustrator document. Actually Illustrator has been getting more and more friendly with the SVG file format in recent years. The method I suggest here will produce the best results in this particular case. Others would work as well.

Make sure your file is saved.

In the File menu, select Export > Export for Screens. Then you will choose SVG as the export format. Follow the image below. Click Export Artboard when you’re done.

The SVG file will be located where you said to export it. It will be called the name of your artboard. In my case it is saved on the Desktop, and is called “Artboard 1.svg”.

CONGRATULATIONS!

Do NOT double click on this new file to open it. I know you just did. But don’t. Instead, open the file in your favourite text editor. OMG! It looks like something you’ve seen before! Yes. SVG is a markup laguage, just like HTML. (I told you this a few paragraphs above, but I know you forgot. Haha, I can even make bad sarcastic jokes in a tutorial!)

So the code in the SVG file should look like this:

<svg xmlns="http://www.w3.org/2000/svg" viewbox="0 0 400 400">
  <g id="mars">
    <circle cx="200" cy="200" r="40"></circle>
  </g>
  <g id="phobos">
    <circle cx="300" cy="200" r="13"></circle>
  </g>
  <g id="deimos">
    <circle cx="350" cy="200" r="4"></circle>
  </g>
</svg>

If your code looks a little different, it’s ok. Don’t worry if it is not tidy like this one. I cleaned it up to make it look good. The Illustrator export will not have new lines and tabs and it’s fine. But if your code looks considerably different than mine, be worried. Try again, perhaps.

Here are the elements to look for.

The <svg> tag. This delimits the SVG code, just like the <style> tag for CSS and the <script> tag for JS code in an HTML document. The <svg> tag has an attribute called viewbox. It is important that this is set to "0 0 400 400". This sets the position and dimensions of the box that contains your illustration.

Notice the three <g> tags. Remember that these are representations of your layers. Each should have an id referring to Mars and its moons.

You will also notice the <circle> tags which draw the circles you created with the Ellipse tool in Illustrator. The cx attribute sets the horizontal position, and the cy sets the vertical position of the circle. This is where we placed the circles, where our guides met. And the r attribute sets the radius. If you remember high school maths: radius equals diametre divided by 2. Yes, maths is geometry, design is also geometry, therefore, design is maths. 🤯 (If this icon does not work on your computer, it’s a [mind blown] emoji.)

Part 3 — Bringing the pieces together

Now that we have the SVG code for our model of Mars, we will need to create an HTML file to hold it, and we will need to import the GSAP library so we can animate it.

Create a plain HTML file. You can use your editor’s shortcut, or copy from a file you already have.

To add the SVG, you will copy–paste the code from the file Illustrator exported directly in the HTML file. Your browser will be able to interpret the SVG code and draw your model. (That’s if you use a decent browser. ;-) )

Here’s a sheat… You can copy–paste this in an empty file if you want a fresh start.

<!DOCTYPE html>
<html>
<head>
  <title>Mars Model</title>
</head>
<body>
<div id="model">
  <svg xmlns="http://www.w3.org/2000/svg" viewbox="0 0 400 400">
  <g id="mars">
    <circle cx="200" cy="200" r="40"></circle>
  </g>
  <g id="phobos">
    <circle cx="300" cy="200" r="13"></circle>
  </g>
  <g id="deimos">
    <circle cx="350" cy="200" r="4"></circle>
  </g></svg>
</div>
</body>
</html>

Notice that in the example above, I have put the SVG block inside a <div> tag. This is mostly to keep it tidy. But I can also control the size of the illustration using this div. Remember that SVGs are scalable. 😜

Adding a bit of style

Like I said earlier (remember? haha), we will give colours to the circles in good old CSS. So we are at this step now. Add a <style> tag to the head of your document, and add rules for each rock. You can use the same colours as me, or others. I also set a width and a border to the container div so it is easier to preview.

Notice that I use the “fill” property to set the colours of the circles. The CSS properties of SVG elements are not always exactly the same as HTML elements. Be careful about this.

  <style>
  #model { /* The <div> containing the <svg> tag */
    width: 400px;
    border: solid black 1px;
  }
  #mars {
    fill: #900;
  }
  #phobos {
    fill: #c93;
  }
  #deimos {
    fill: #963;
  }
  </style>

That’s it for now. You’ll be able to play with the CSS more in your own animation.

Import the GSAP library

I believe you have been introduced to libraries in other web courses. A JS library, like GSAP, is a collection of code written to be used in your apps. It is like somebody wrote all these fancy commands that do cool tricks, and all you have to do is use them. [<< carricature]

To use GSAP, like any other library, you need to load the code in your HTML file. In any file where you will write code that refers to GSAP, you need to load it. It’s an external JS file. Copy and paste the following line inside the <head> of your file.

  <script src="https://cdnjs.cloudflare.com/ajax/libs/gsap/3.7.1/gsap.min.js"></script>

If you’d like more detailed instructions on how to install GSAP with options, go watch this video. Also note that this links to version 3.7.1 which has probably been updated since I wrote this. So if you want a more recent version, get the link from the GSAP site. For this tutorial though, we do not use fancy features, so this version will do.

We now have everything in place. We can animate our model.

Part 4 — The Animation

GSAP makes it easy to animate elements in your page. It provides straight forward code to make simple tween based animations. It also can do complex animations if you want to.

We will write JS, so you should create a <script> tag at the end of your file, just before the closing </body>. We will write all the code in this tag. To be fair, there is not a lot of code to write.

To animate an object with GSAP, you simply need to assign it to a gsap.to() command with the properties you want. This will create a tween: the initial state is the current properties of your element as written in the CSS, and the final state is the properties you write as options to the to() function. GSAP will take care of animating the element between the two states. (I cannot get into the details of all the options and commands available in GSAP. You can look at the documentation to explore the possibilities.)

Planning is everything. What we want is to animate two <g> elements from an SVG illustration. (Mars does not move, it stays in the centre.) Both objects will perform a circular motion around the centre of the illustration, return to their initial position, and start rotating again. That’s the plan.

We will start by animating Phobos (the rock closest to Mars). The code is the following. Include this in your script tag. I will explain it below.

let phobosAnim = gsap.to(
  "#phobos",
  {
    duration: 1,
    rotation:360,
    svgOrigin:"200 200",
    repeat:-1,
    ease:Linear.easeNone
  }
);

You’ll remember basic JS code. The first line creates a variable called phobosAnim and assigns to it the result of the function gsap.to(). This is a function that comes from the GSAP library. Inside the parenthesis, we find the parameters sent to the function which define the properties of the animation.

The first parameter is the selector of the element to animate. (Same as CSS selectors.) In our case #phobos. This is the id of the <g> element that contains the circle that was on the phobos layer in Illustrator. After the target element come the options, inside the curly brackets. These are pretty clear, I think.

The duration sets the duration of the animation, in seconds. The rotation makes the object rotate, in this case a full 360 degrees. Note that this is only in 2D. GSAP can do 3D, but we are not going there in this tutorial. Next comes the weird but kinda obvious svgOrigin which sets the centre of rotation in relation to the SVG box. In our case, the illustration is 400px by 400px, and we want the rock to turn around the centre, so the value here is "200 200". Then we have repeat which sets how many times to loop the animation. The value -1 sets it to loop forever, which is what we want.

The last option, ease, turns off any easing curve in the motion. This one is a bit more complex to explain (it’s based on calculus, yeah maths again), but see it like this: an easing curve makes the animation speed up or slow down at the start or toward the end. This can give the illusion of gravity for example. It is usually a good thing to add easing to your motion (check out the 12 basic principles of animation where easing is called “slow in and slow out”), but in this case, we want the rocks to move in a regular motion around the planet. Easing would make it look strange. GSAP has easing set by default, so we must turn it off with this option. (You can comment out this line and see what happens.)

The code for Deimos is very similar. It looks like this:

let deimosAnim = gsap.to(
  "#deimos",
  {
    duration: 4,
    rotation:360,
    svgOrigin:"200 200",
    repeat:-1,
    ease:Linear.easeNone
  }
);

The only differences are the name of the variable, the id of the target, and the duration. This rock moves more slowly. Note that the relative speeds are also proportional to the real rocks up there in the universe. You need both code blocks to animate both rocks.

Wrap Up

If you open your HTML file in a browser, you should now see an animated model of Mars and its moons.

Just to be sure, here is the whole file, with all the required code. I have also prepared this file for you to see the result. You can look at the code in this file and compare with yours.

<!DOCTYPE html>
<html>
<head>
  <script src="https://cdnjs.cloudflare.com/ajax/libs/gsap/3.7.1/gsap.min.js"></script>
  <title>Mars Model</title>
  <style>
  #model {
    width: 400px;
    border: solid black 1px;
  }
  #mars {
    fill: #900;
  }
  #phobos {
    fill: #c93;
  }
  #deimos {
    fill: #963;
  }
  </style>
</head>
<body>
<div id="model">
  <svg xmlns="http://www.w3.org/2000/svg" viewbox="0 0 400 400">
  <g id="mars">
    <circle cx="200" cy="200" r="40"></circle>
  </g>
  <g id="phobos">
    <circle cx="300" cy="200" r="13"></circle>
  </g>
  <g id="deimos">
    <circle cx="350" cy="200" r="4"></circle>
  </g></svg>
</div>

<script>
let phobosAnim = gsap.to(
  "#phobos",
  {
    duration: 1,
    rotation:360,
    svgOrigin:"200 200",
    repeat:-1,
    ease:Linear.easeNone
  }
);
let deimosAnim = gsap.to(
  "#deimos",
  {
    duration: 4,
    rotation:360,
    svgOrigin:"200 200",
    repeat:-1,
    ease:Linear.easeNone
  }
);
</script>
</body>
</html>

You are done with this tutorial.

You can now animate an SVG illustration using the GSAP library. Like I said above GSAP has lots of options that you can use to make complex animations. It also can animate any property of elements. Explore and build your own animation using this technique.

Extra — Add Interaction

This is optional, but to add a bit of extra, and somehow anticipate the next project, I will show you how to add interactions to your animation. This means that we will add things triggered by the user interacting with the animation. To add such interactions, we will use events. You remember event listeners in JS let you trigger functions when something happens: the user clicks, the mouse moves, a text field receives focus, etc. We’ll use event listeners to control the animation and to trigger things.

Play & Pause Toggle

The first interaction we’ll do is pause the animation when the user clicks on it. All we need for this is a click event that calls a GSAP command on our animation objects. The code looks like this. (This code should be in your <script> at the end of your file.)

document.getElementById("model").addEventListener("click",function() {
  if (deimosAnim.paused()) {
    //The animation is paused, play it
    deimosAnim.play();
    phobosAnim.play();
  }
  else {
    //The animation is playing, pause it
    deimosAnim.pause();
    phobosAnim.pause();
  }
});

The first line here adds a click event listener to the #model element. This is the <div> that contains the SVG code. So when the user clicks the animation, whatever is in the largest curly brackets runs. Remember that we have two animations, we called GSAP twice, once for each moon. So we need to apply the pause and play to both.

The second line sets a condition: if (deimosAnim.paused()) {. This checks if the animation is paused. Note that the condition only checks one of the two animations because they are synchronized. We don’t need to chek them both. Those pause() and play() functions are provided by GSAP, by the library. We just need to call them.

Inside the condition’s if block, we start playing both animations; they are paused. We refer to the animations using the variable names we gave them when they were created a few JS lines above: deimosAnim and phobosAnim.

Next comes an else { block in which we put what happens if the animations are in fact playing: we set both to pause.

Fairly simple.

Highlight a rock

There are other effects we can do. For example, let’s make Mars scale up on mouse over. This can be used for emphasis in a presentation.

The following JS code, which you can write after the code above, scales Mars slightly when the mouse is over it, and scales it back to normal size when the mouse leaves. You can probably also imagine using this to add a label that would appear on mouse over to identify the rock: “This is Mars”. For this, you would need to add this label in your SVG file (on a separate layer in Illustrator!), set it to be transparent by default, and make it appear with an event. Magic!

document.querySelector("#mars").addEventListener("mouseenter", function() {
  let marsUp = gsap.to(
    "#mars circle",
    {
      duration:0.5,
      transformOrigin:"50% 50%",
      scale: 1.3
    }
  );
});
document.querySelector("#mars").addEventListener("mouseleave", function() {
  let marsDown = gsap.to(
    "#mars circle",
    {
      duration:0.5,
      transformOrigin:"50% 50%",
      scale: 1
    }
  );
});

I think this code should be familiar enough at this point. First we set a listener for the mouseenter event. This gets triggered when the mouse slides above the #mars element. (Note that this does not work well on mobile. We would need touch events to handle mobile interactions.)

When this is triggered, we create a GSAP tween to scale Mars’s <circle> element (remember that #mars is a group, a <g> tag, we want to scale the shape) by a factor of 1.3. So the target parameter is #mars circle. The transformOrigin option makes the circle scale from its center, so it grows symmetrically. And lastly, we need to set a listener for mouseleave to reverse the scale and return Mars to its original size when the mouse is no longer over Mars. Notice that we did not turn off the easing on these tweens, so the scale animation slows down at the end. (You can see the result of this code in the model example I put at the begining of this tutorial way up there on this page. It was there all along!)

We will focus on these kinds of interactive micro animations in the next project. So we’ll talk about this more when we get there.